Before You had to schedule PowerShell scripts from Your task scheduler inside servers or workstations but not that has changed, You can run Your favorite scripts directly from Azure with Automation Accounts and runbooks.
Table of Contents
What is Azure Automation Account?
Azure Automation Account let’s You automate Your tasks for cloud-based automation, operating system updates, and configuration service that supports consistent management across your Azure and non-Azure environments. It includes process automation, configuration management, update management, shared capabilities, and heterogeneous features.
Pricing
Process automation
Process automation includes runbook jobs and watchers. Billing for jobs is based on the number of job run time minutes used in the month and for watchers is based on the number of hours used in a month. Charges for process automation are incurred whenever a job or watcher runs. You will be billed only for minutes/hours that exceed the free included units.
| Free units included (per month)** | Price | |
|---|---|---|
| Job run time | 500 minutes | €0.002/minute |
| Watchers | 744 hours | €0.002/hour |
Configuration management
Configuration management includes the configuration pull service and change tracking capabilities. Billing is based on the number of nodes that are registered with the service and the log data stored in the Azure Log Analytics service.
Charges for configuration management start when a node is registered with the service and stop when the node is unregistered from the service. A node is any machine whose configuration is managed by configuration management. This could be an Azure virtual machine (VM), on-premises VM, physical host, or a VM in another public cloud. Billing for nodes is pro-rated hourly.
| Free units included (per month)** | Price | |
|---|---|---|
| Azure node | N/A | Free |
| Non-Azure node | 5 nodes | €5.2862/node |
Update management
Update management includes visibility and deployment of updates in your environment. There are no charges for the service, you only pay for log data stored in the Azure Log Analytics service.
| Free units included (per month)** | Price | |
|---|---|---|
| Any node | N/A | Free |
Supported services
Supported services with HTTP webhook or API method:
How to setup Automation Account?
Search for Automation Accounts.

Click create new.

Select subscription and resource group, then give it a name and where the data will reside.

Select System Managed identity or If You want You can also use User Assigned.

Choose public or private, which ever suits Your needs.

If You want to choose private access, You need to provide a Private Endpoint for it. Define Private DNS integration also for connecting from internal resources.

For my demo and use case I will use public.
When the resource have been created, click Go to resource.

Configuration steps
First You have to import PowerShell modules You want to use inside the Runbook
Importing Modules
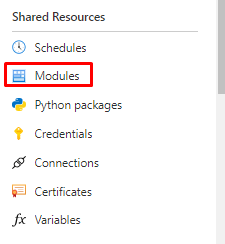
Open shared resources -> Modules

In here you can filter with the module version. 7.1 is still in preview so using 5.1

You can also add Your own modules if needed.

But I will use default ones for my example. Open browse gallery.

And search for AzureAD

Note to Self! For my future posts, there is also Microsoft365DSC module available.

In here You can search for commands in inside the module to see if it’s the right one for You. If You are happy You can choose select.

Select runtime to 5.1

Importing will take about 5mins, so have patience.


There seems to be 230 different commandlets.

Automation credentials
Open credentials from the Shared Resources. And Add a credential.

And then create an account.

And done.

Runbook
Open Process Automation -> Runbooks and Create a runbook.

Give it a name, choose Runbook type to PowerShell and version to 5.1


Implementing the code
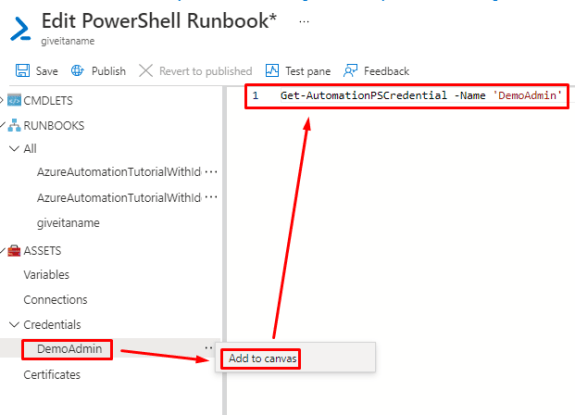
In the next screen You can see all the resources You specified for the runbook. You can also assign then to the canvas like in my example.

But I will just put my code and click Save.

And then Test pane.

When in the test pane You can start the runbook.

And when the test is done, You will see completed and information from the tenant.

When the test is done, You have to publish to make a schedule.

Scheduling
Choose Shared Resources -> Schdules -> Add a schedule.

You can choose start date and time, when does it trigger after the first run. And choose to set expiration or not.

Audit logs in the destination
When You run the Runbook and the process is completed, You will se the User that You defined in the Credentials running the tasks and in the additional details You will see a User-Agent like below.

That’s all I had for this post. Hopefully You found it useful to Your own projects or just for learning purposes.


 RSS - Posts